Quite some time ago, I published scripts to implement password policies for MySQL, and promised to show how to expose violations of that policy via MySQL Enterprise Monitor (MEM). That stalled somewhat with other objectives, but I want to revisit it now that MEM 3.0 is GA. If you haven’t tried MEM 3.0 yet, consider doing so – it’s quick and easy to set up.
Many people don’t realize that MEM can be extended to monitor things beyond MySQL Server health, including visibility into application state as observed from the database. In part of the hands-on-lab I recently led at MySQL Connect, we implemented simple application state monitoring to alert – via MEM – when the number of active application sessions exceeded certain thresholds. This isn’t a new feature in MEM 3.0 – it was possible in earlier versions as well, and the process I’ll describe here in adding MEM alerting to password policy violations can be applied with only a few modifications to MEM 2.3 deployments.
The instructions below assume you’ve implemented the password policy scripts described in my earlier post. The end result of these scripts is that violations of password policies will be recorded in password_policy.user_password_policy_violation table when the password_policy.check_password_policy() stored procedure is run. An example violation record is shown below:
mysql> SELECT * FROM password_policy.user_password_policy_violation\G
*************************** 1. row ***************************
                     id: 1
             history_id: 12
                   host: localhost
                   user: pwd_test
         violation_type: 3
     violation_resolved: 0
      violation_message: pwd_test@localhost reused password from 2013-10-02
violation_reported_date: 2013-10-02 12:14:09
1 row in set (0.00 sec)
So we’re starting with data in the database which we want to expose to MEM.
Defining Custom Data Collections
The first step in getting the data from the database to MEM is to define a custom data collection. This is done by defining the data collection in etc/custom.xml file (from the Agent installation directory). We’ve defined three different password policy aspects (no blank password, password duration, password reuse), we’ll create three different custom data collections – one for each policy aspect. Below is the full custom.xml file I am using:
<?xml version="1.0" encoding="utf-8"?>
<!DOCTYPE classes SYSTEM "items-mysql-monitor.dtd">
<classes>
    <class>
                <namespace>password_policy</namespace>
                <classname>expired_passwords</classname>
        <precondition><![CDATA[
  SELECT COUNT(*)
    FROM information_schema.tables
    WHERE table_schema = 'password_policy'
    AND table_name = 'user_password_policy_violation'
            ]]></precondition>
                <query><![CDATA[
  SELECT COUNT(*) violations, GROUP_CONCAT(violation_message) messages,
      GROUP_CONCAT(CONCAT('\'', user, '\'@\'', host, '\'')) users
    FROM password_policy.user_password_policy_violation
    WHERE violation_type = 2
      AND violation_resolved = 0
                ]]></query>
                <attributes>
                        <attribute name="violations" counter="false" type="INTEGER"/>
                        <attribute name="messages" counter="false" type="STRING"/>
                        <attribute name="users" counter="false" type="STRING"/>
                </attributes>
    </class>
    <class>
                <namespace>password_policy</namespace>
                <classname>reused_passwords</classname>
        <precondition><![CDATA[
  SELECT COUNT(*)
    FROM information_schema.tables
    WHERE table_schema = 'password_policy'
    AND table_name = 'user_password_policy_violation'
            ]]></precondition>
                <query><![CDATA[
  SELECT COUNT(*) violations, GROUP_CONCAT(violation_message) messages,
      GROUP_CONCAT(CONCAT('\'', user, '\'@\'', host, '\'')) users
    FROM password_policy.user_password_policy_violation
    WHERE violation_type = 3
      AND violation_resolved = 0
                ]]></query>
                <attributes>
                        <attribute name="violations" counter="false" type="INTEGER"/>
                        <attribute name="messages" counter="false" type="STRING"/>
                        <attribute name="users" counter="false" type="STRING"/>
                </attributes>
    </class>
    <class>
                <namespace>password_policy</namespace>
                <classname>blank_passwords</classname>
        <precondition><![CDATA[
  SELECT COUNT(*)
    FROM information_schema.tables
    WHERE table_schema = 'password_policy'
    AND table_name = 'user_password_policy_violation'
            ]]></precondition>
                <query><![CDATA[
  SELECT COUNT(*) violations, GROUP_CONCAT(violation_message) messages,
      GROUP_CONCAT(CONCAT('\'', user, '\'@\'', host, '\'')) users
    FROM password_policy.user_password_policy_violation
    WHERE violation_type = 1
      AND violation_resolved = 0
                ]]></query>
                <attributes>
                        <attribute name="violations" counter="false" type="INTEGER"/>
                        <attribute name="messages" counter="false" type="STRING"/>
                        <attribute name="users" counter="false" type="STRING"/>
                </attributes>
    </class>
</classes>
As a matter of practice, double-check the SQL statements to ensure they produce the results you expect. Changing custom data collections after the Agent has first read them can be difficult. Also for this reason, you should test this on a non-production deployment of MEM initially, and deploy to production only once you have tested and are satisfied that the data collection and advisor definitions work appropriately.
In the custom.xml file above, we use a common namespace of “password_policy” for all three data collections, but the classname element differs. These two elements are like a composite primary key – you’ll want to avoid name collisions here. We’ve defined a precondition check, to make sure that the password_policy.user_password_policy_violation table exists, and we’ve defined three slightly different queries for each of the policy aspects. The attributes are the column names, and we’ve indicated their data type (and the fact that none are counters, which would trigger MEM to calculate deltas between data sets).
Once the custom.xml file is saved, the MEM Agent must be restarted to load the new file.
Creating an Advisor
Once the Agent has been restarted, it will notify the MEM Service Manager that it can collect the newly-defined data items. The next step will be to create a custom advisor in the Service Manager, using those data elements. In MEM 3.0, click on the “Configuration” menu item to expand it, and select the “Advisors” sub-menu item. At the top of the resulting page, you will find the “Create Advisor” button – click it, and you will be taken to a page where you can define a new advisor. In the “Variable Assignment” section in the middle of the page, try to find the new data elements in the “Data Item” drop-down by starting to type one of the names: “password_policy:reused_passwords:violations”. If you don’t see the new data elements in the drop-down, try refreshing the page – sometimes the Agent hasn’t reported in yet and the data collection options haven’t been updated. I do this before any other steps, because it’s always a pain to get have completed the other fields only to find that the data collection item isn’t loaded yet, and I have to refresh the page (losing my work in other fields).
Once you’ve confirmed that the data items you want exist, start to complete the fields on the page:
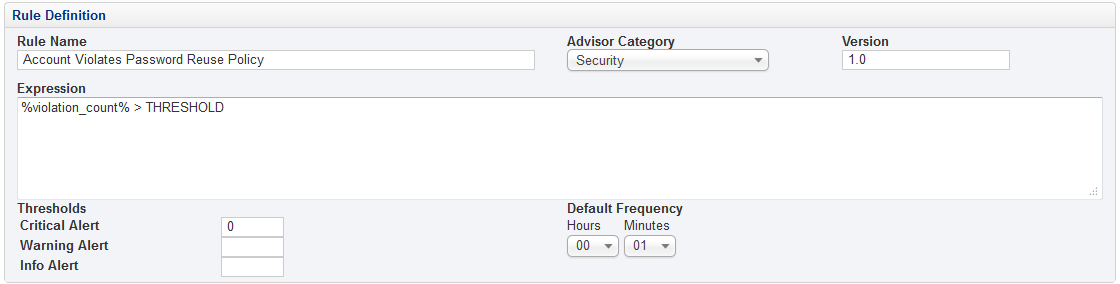 In my case, I’ve named the Advisor, “Account Violates Password Reuse Policy”, and I’ve placed it in the “Security” category. I’ve left the version at “1.0”, and used the expression, “%violation_count% > THRESHOLD”. I’ve set only one threshold: Critical at zero. For testing purposes, I set the default frequency to execute every minute (real deployments would want to do this less frequently, possibly once a day).
The %violation_count% variable wasn’t defined in the custom.xml file, so where did that come from? That aligns with the variable assignment section found a little lower on the page:
![]() Here we’ve taken the data items defined by custom.xml and bound them to a variable. Note that the syntax with surrounding percentage signs is not required – it just makes it easier to identify variables in other contexts. In this case, I’ve bound “password_policy:reused_passwords:violations” to %violation_count%” and “password_policy:reused_passwords:messages” to “%violation_messages%”. The instance is set to “local” for both.
Here we’ve taken the data items defined by custom.xml and bound them to a variable. Note that the syntax with surrounding percentage signs is not required – it just makes it easier to identify variables in other contexts. In this case, I’ve bound “password_policy:reused_passwords:violations” to %violation_count%” and “password_policy:reused_passwords:messages” to “%violation_messages%”. The instance is set to “local” for both.
Finally, we can add context information to the Advisor so that meaningful action can be taken when an event is triggered. This is done in the Rule Info section:
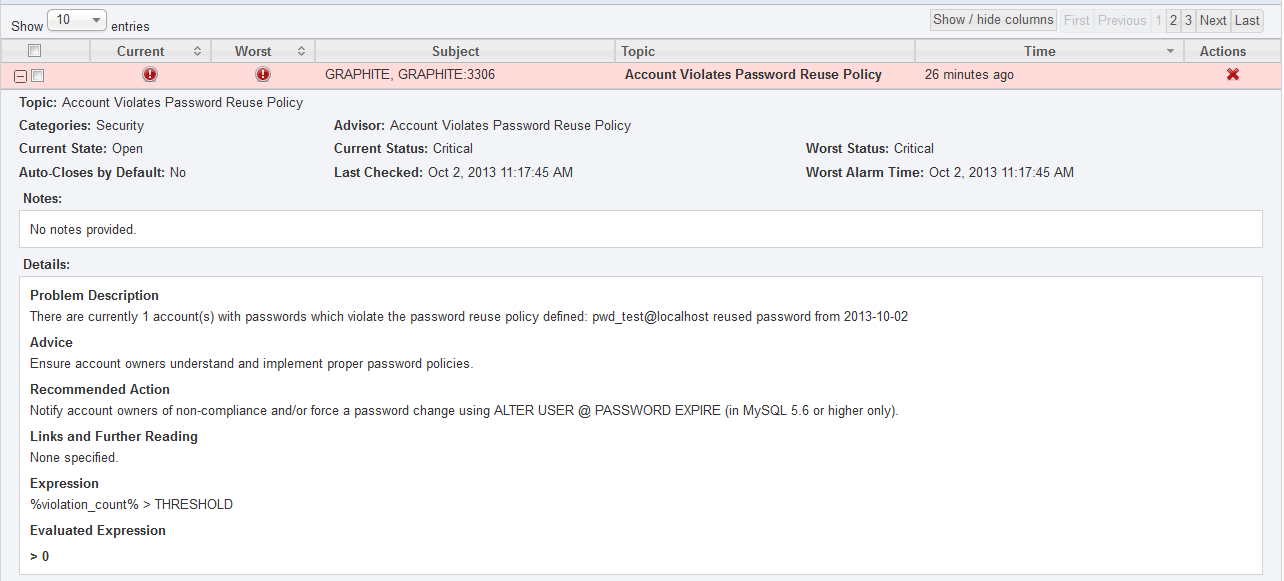
 The variables defined earlier can be referenced in these sections. For example, the “Problem Description” includes the policy violation messages in addition to the number of accounts in violation of the policy.
Once these three sections are completed, click the “Save” button at the bottom to save your new advisor.
Scheduling the Advisor
Now that you have defined your custom Advisor, it’s time to schedule it. In the same “Advisors” page where you found the “Create Advisor” button, expand the “Security” group and find the newly-created “Account Violates Password Reuse Policy” Advisor, expanding that. Navigate down to the host where you deployed the custom.xml and click on the menu to schedule the Advisor for that host. You won’t need to change any defaults, and the end result should look something like this:
 Review Resulting Event

Once the Advisor has been scheduled, wait a minute or two before clicking on the “Events” menu item. Using the filter to find just the”Account Violates Password Reuse Policy” Advisor events, you should be able to see an event once the password policy has been violated:
 That’s all there is to it! In another post, I’ll demonstrate how you can create custom graphs to monitor state over time, expanding this example to track accounts violating policy over time.
Happy monitoring!

Hi there,
Good explanation about the custom rules.
Once we have the data collector in place, can we use this data to generate custom graphs?
That will be great if you can explain(maybe a new blog post 😀 ) how to create custom graphs.
Hi Marcelo,
Glad you found it helpful! Yes, I’m hoping to have another post soon on creating custom graphs.
FYI, custom graph creation is covered in this new blog post.
I’ve created a number of application specific and generic rules for MEM 2.3. It really is one of the hidden gems of MEM 🙂